Monday, June 4, 2012

Proton Exora Bold (MT)

It is the first 7 seater wagon from Proton, our first nation car manufacturer. It was first introduced into the market in the year of 2009. At first glance when I saw it in the show room, I assumed it's just another rebadge model from Mitsubishi, which is what Proton used to do. Proton had been rebadging car models from Mitsubishi since it was formed in 1985.   But I was wrong: this Exora model is in fact a local design one.

Exora Bold is the 1st facelift of Exora that introduced in early 2012. Some changes been done on the outlook of the car, as well as the engine. I will come to the engine later, but let's look at the outlook first.


There is a significant "facelifting" of the front bumper of the car. The bumper look "bold" and sporty with the additional side grill air vent when compare to the original front bumper.


There is not much change of the real except the additional rubber body kit at the real bumper and smoked real lights instead the clear one. Apart of that, nothing major changes for this "facelift" model.


Power wise, Exora houses a 1.6 cc CPS engine. But for Exora Bold, there is another variant that houses a turbo charged 1.6cc CPS engine which is called a CFE engine. With turbo charged, one claim that the engine would pump out the power that is similar to a 2.0cc engine. However, the one I am driving one is a Exora Bold 1.6cc manual transmission, which it's not a CFE engine.

I've tested both the 1.6cc A/T and 1.6cc CFE models. I was really disappointed by the performance of the A/T but I am impressed by the CFE one. I could feel the power of the CFE, but not the CPS A/T. Hence, to compensate the "power lost" of the CPS A/T, I choose the CPS M/T instead. To my surprise, the car respond quite well and I could feel the push, which I don't when I was test driving the A/T one.


 Gear shift for the M/T is difficult when compare to my ex-lover, Nissan Sentra N16 M/T. The Sentra M/T gear shift was smooth and easy and soft, but Exora's is hard and "tight". "It's probably because it's new, hence you feel the hardness." is the reply from Proton Service when I sounded this problem to him. What the.....


The desk-board is simple and clean. Everything is placed in the middle: the radio, centre air vent, emergency light switch, real heater switch, three air-condition knobs, interior air circulation switch and cooling switch. Very typical for a Proton mid-range car which there is no much complicated switches/electronics monitors placed in a small place.

There is radio control on the steering wheel, and two air bags provided (driver side and front passenger side).

Simple and yet all necessary control is there.


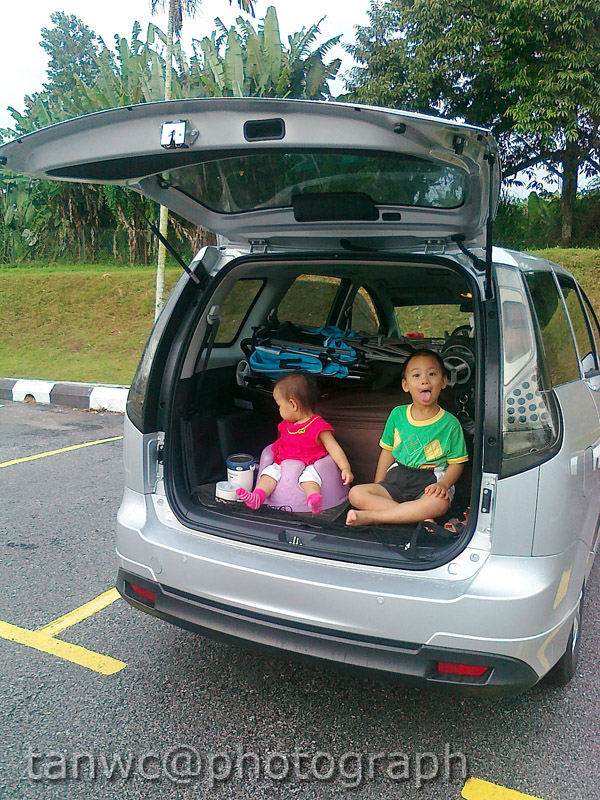
I have no complaint for the size of this car. This is a HUGE car that offer HUGE interior volume. There are 3 rows of seats which legally could carry 7 adults passengers. The last row of the seat could be folded to clear a huge boot space. As you can see in the photo above, both of my kids where sitting while we fed them in a rest area along NSHW where the 3rd car seat been folded down.


The ICE (In Car Entertainment) is rather standard for a family car. The radio-CD front unit is of Blaupunkt and comes with car there is another 9" screen DVD player unit which is mounted on the ceiling of the car. To operate this DVD player is a struggle in my opinion where instead direct connect to in car speakers, this DVD player uses FM radio transmission to transmit audio signal. In order to watch any movie or listen to songs, one would required tune into the certain FM frequency from the car's radio set that this DVD is transmitted. Hence,  there is no guarantee smooth transmission of sound if the frequency channel been tuned in isn't used by any radio station.


So, how about fuel consumption ? This car has a curb weight of 1,900kg. With a puny engine of 1.6cc, I would expect to see a huge expenses on fuel if compare to my ex-car Nissan Sentra 1.6cc M/T. I've travelled long distance with this Exora from Pg - KL which clocked at 17 sen/km, and normal daily commute from house to work with moderate traffic jams, worse at 18.5 sen/km. Not bad to my standard  I would say.

I find it hard to master the programmable wiper speed as describe in the user manual. I would prefer a simpler knob turning mechanism instead of turning off the wiper before it comes to rest position and start counting how many seconds you wish it to interval and turn it on again. So troublesome and so confusing !

It's heavy and sturdy when driving along heavy rained highway, it offers great space, it has the best air condition (one of the best from Proton) and it has great suspension system (I believe it's a Lotus tuned, but the brochure says it's a Proton tuned). However, with such a puny engine, I still feel lack of power when climbing up hills, very cheap looking plastic interior desk-board and seats, quite poor workmanship though. As conclusion, after driving it for almost 2 months, and total travel of about 2,800 km, I would say for a car which is cost at RM 67,000.00 (OTR) I am satisfy with it. So far so good !
 

Saturday, April 7, 2012

DIY Project : Beauty Dish Part 3: The DIY Steps - The Flash Bracket

In Part 1 (link), I came out with the basic design parameters for my beauty dish.
In Part 2 (link), I shown the DIY steps to built up the reflector bowl for my beauty dish.

And in this Part 3, I show you the DIY steps to construct the flash bracket.

I use a 16mm wide by 3 mm thick Aluminium bar as my building material. I have all the tools require to work with aluminium. All parts will be fastened by bolts and nuts and no welding is required.

The idea of my flash bracket is simple: to hold the flash and the beauty dish in place onto a flash tripod. The bracket should be adjustable to suit different sizes of the flashes.

The bracket dimensions had been determined to suit for Sony flashes of F58am, F43am and F42am. Hence, the Aluminium bars were cut accordingly.

The bracket consists of two parts: the main supporting bar and the flash supporting bar. The main supporting bar is the bar that support the reflector bowl and the flash supporting bar. The flash supporting bar has a sliding mechanism so it could move up and down from the flash opening on the reflector bowl that suit the size of the flash it's used.

To construct the main support bar, an aluminium bar is cut.


In order to suit the gigantic size of F58am, a bar length of about 7 inches is required. The next step would be drilling two holes on one end of the bar so to fasten this bar to the reflector bowl, and the other end would be a strip of opening strip for sliding purposes.


A series of holes been drilled before turning these holes into sliding strip.


With a proper tool and effort and some muscle work, I'd turn the series of holes into a long strip.


Bend the end up to suit the curvature of the bowl. The bended end would be fastened onto the bowl with bolts and nuts as shown in the pic below:


The next one to do is the flash supporting bar. This bar would have another sliding mechanism so the flash could be adjusted according to the flash head size as well.


A bar with approximately 5 inches in length is cut.


Drill the holes and with some muscle work, make another slider strip as shown in the pic above.


Bend up the end of the bar. The bend end will be connected to the supporting bar with bolt and butterfly nut. And the flash support bar is completed.


This is how it look when everything is fixed together.


How the flash stand is fixed onto the flash supporting bar.


And how the flash bracket is fixed onto the flash stand.

The next step would be the painting. I bought a can of black spray paint to paint the exterior of the beauty dish to make it look more elegant, and the spray white paint onto the internal of the beauty dish for better reflection. And walla, I have my own DIY beauty dish!


The beauty dish with F43am.


Beauty dish with F42am.


Beauty dish with F42am.

And test fire:


Yes, it doesn't throw that ugly shadow of the middle reflector!

And now I am happy. :D


My DIY beauty dish steps by steps:
:: Part 1 - The Design ::
:: Part 2 - The Bowl ::

DIY Project : Beauty Dish Part 2: The DIY Steps - The Reflector Bowl

In Part 1 (link), I found the distance of the middle reflector to the flash head plays a crucial role in beauty dish design: the bigger the distance between the flash head and the reflector, the more significant the shadow of the reflector blocking the flash beam it will be.

The second important part not to oversee is the flash holder. The flash holder must be strong to hold the beauty dish and the flash.

In this part 2, I would show the step by step of constructing my own beauty dish. I rate this project as 4 out of 5 in complexity where some special tools are needed to complete my project. To name some of them is driller, electrical table saw, router etc.

Material used in this DIY are:
1) The down-light reflector as the main bowl.
2) 8mm thick plywood as main support plate.
3) 3.6mm thick plywood with white surface as middle reflector.
4) 3 numbers of 6mm diameter, 4 inches in length screws with nuts.
5) Some other screws and nuts that fits.

The Reflector Bowl


I am using this down light reflector as my main dish bowl. It has a opening diameter of 22cm and depth of about 12cm. I required the bowl, not the bulb holder. Hence, with an electrical metal cutter, I cut out the bulb holder leaving some small portion of the holder to hold my base support plate.


The edge is rough, it will be dealt later. My reflector bowl is ready, and I am ready to construct the support plate.


For the support plate, I glue two pieces of plywood, a 8mm thick plywood and a 3 mm ply with white laminate, together. The white laminate finished could as as a good reflection surface when it mounts into the bowl.


After the support plate being prepared, trace the diameter of the opening onto the plate. Cut out the round plate with table saw.


This plate will act as the main support plate for the inner reflector of the dish. The next step is to cut out an opening on this circular plate. The size of the opening should big enough to let the flash head go through it.

As shown in the pic above, the size of the my flash head, which is a F58am, is marked onto the plate. The three crosses would be the holes for the 4 inches length screws which will act as the middle reflector holding screws.


Cut the opening with a router and sand it out to get a smooth edges.

The next to do is the middle reflector.


I glue two pieces of 3mm ply with white laminates. I marked the centre of the plates which will be the centre point of the circular reflector, and the 3 screws holes as well. These holes were traced from the main support plate which were done earlier.

With proper tool, in my case, a table saw, cut out the reflector into a circular plate:


The three crosses are where the support screws will be. These three holes must be inline with the holes that been drilled on the base/support plate.

The diameter of the middle reflector is about 1cm bigger than the base plate.

Next, for the holding screws, I use the longest screws available that are easily purchase in the local hardware shop that I use to go.


The longest screws I could get is these 4 inches ones.


With nuts, the screws are fastened onto the base support plate....


And the middle reflector as well.


The view of the other side of suppor plate with flash head opening. The next photo shows where the support plate will be mounted to the reflector bowl.


Now, everything to be held in place by screws.


Complete Part 1. Next, would be the flash support bracket.

::Part 1 : The Design::
::Part 3 : The Flash Bracket::

Sunday, April 1, 2012

DIY Project : Beauty Dish Part 1: The Design

I wished I had a beauty dish. I wished I would able to DIY my own beauty dish. Why beauty dish instead softbox ? Because it is a BEAUTY dish. Period. LOL.

I think it would make someone look prettier when she/he been light by a beauty dish modifier. Of course it's not true. It's just another light modifier.

I made my very first beauty dish from a plastic laundry bowl some years ago, which turned out to be a total failure. I planned to DIY one proper one with more suitable material than plastic bowl, but it was put on-hold after my son was born in 2008.

Not until recently that I saw one very suitable material to build my own beauty dish. My hand got bitten by DIY bugs and I started to plan my next beauty dish project.

What did I found ?


This is the downlight reflector. It has an opening diameter of about 22 cm, and it has a curvature reflector which could throw the light evenly and it's made of light metal kind of thingy (not aluminium, but it's zinc like material). Perfect for a beauty dish.I had found my major component, and I started to construct my beauty dish.

 I work with my father as a carpenter that manufacture custom made furniture cabinet. We have variety of furniture accessories that, in my opinion, could made a great beauty dish. Hence, before I head out to hunt for better material, I used what ever I could find in my factory to built my beauty dish prototype.

My initial idea was to construct a reflector within the bowl that could reflect the flash light back to the bowl and it could give a "grow" type of flash light. Hence, without thinking much, I made my first beauty dish prototype as shown:


The reflector is made of thin plywood with white surface, and it's supported by some aluminium bar. The flash holder was made of wood, and my flash was held temporary by rubber bands. It looks ugly I know, and it didn't work as I thought it should be.

Notice the middle one of the above photo? I didn't get the white grow of the whole beauty dish as it suppose to have. The middle reflector had block much of the light, and the aluminium bars cast ugly shadow inside the reflector bowl.


The design of the middle reflector do play a very important role in beauty dish design. Careless design of the reflector could give me a disaster as shown in the above pic. The middle reflector cast this ugly shadow and it blocks the light so much!

Upon careful investigation, I found out that the further the middle reflector from the flash, the more significant the shadow is. My first prototype has a reflector distance about 5 inches, which is about the depth of the light reflector bowl I am using.

Hence, I made my second prototype which I concentrated on the reflector design. Instead using aluminium bars to support the reflector, I used screws.

I went to a local hardware shops to look for the longest screws commercially available, and I found the longest is 3 inches long. I bought three, and re-DIY my first prototype. And I got this:


There is an additional step I did, i.e. spray the inner reflector with which paint. Since the distance between the reflector and the flash had reduced, it give a better and broad reflection onto the bowl. And no more ugly shadow of the supporting bars.


Yup, it gives a better flash throw without that ugly shadow in the middle.

Alas, I have my very own beauty dish. I would share the DIY steps once I finished compiled the steps. Stay tune ! :D

:: DIY Beauty Dish Part 2 ::
:: DIY Beauty Dish Part 3 ::

Monday, February 27, 2012

DIY Project : Honey Comb Flash Adaptor

It's been years after my last DIY project which I was actively flexing out my hands and mind to do some DIY lighting mods. Mainly due to my time been filled up by work and, after being a father of two, I had lost almost all my free time.

I'd op to DIY up one honey comb flash adaptor for a while. I've been looking for black plastic straws for this DIY project in local major supermarkets. It took me some time to get one as black straws are extremely rare item to put on sale. Most straws that could be easily been found on rack are mostly coloured one.

Why straws ?

When I completed my DIY flash grid adaptor, I was expecting to see a circular but I was wrong. I wanted to have a circular flash throw. After some reading from internet, if I wish to have a circular shape light throw, I need to have a circular shaped grid adaptor.

Straws are the best material to be a circular grid adaptor since it is circular. And it's cheap as well. For a package of black straws which consist of 100 straws would only cost me RM 5.00, but as I mentioned above, black straws are extremely rare and not easy to find. I was lucky enough to find one in a supermarket near my house.

So, I've got the major material I want. Let see what other things needed to complete this adaptor:


Black straws, scissors and/or knife for cutting, cloth tap, glue. ruler and a piece of hard cardboard. I will construct this adaptor base to my Sony F43am flash.

First, took the outer circumference measurements of the flash head. For the case of Sony Flash F43am, the circumference measurements of the flash head is 68mm by 40mm.


Then from the measurements, determine how many layers of straws needed for this adaptor:

For F43am, I need around 6 layers of straws, each layer require 10 straws. Hence, I needed about 60 numbers of straw tube.

Then, cut out total of 60 numbers of straw tube, each length about 1 inch long.


By using a cloth tape as base, carefully arrange the straw tube for the first layer onto the sticky side of the cloth tape. By doing so, I could temporary secure the tubes into one layer.


Then apply glue on the first layer and carefully arrange the second layer of tubes.


Repeat this step until I have my desired measurement and size:


Secure this honey-comb head with more cloth tapes.


Now for the adaptor to the flash head. I use hard cardboard my building material being reason that hard cardboard is easy to work with and it cost none to nothing. For a huge piece of hard cardboard just cost my RM 3.00 and it's easily purchase in major bookstore.

Again, from the flash head circumference measurements, I measured out the required length and cut out the cardboard.


Fold it up to get into shape and fit well onto the flash head. Glue the straw-made honey comb into the cardboard holder, secured it with more cloth tapes and/or glue, and walla, I got my honey comb flash adaptor!


So, how does the flash spill would look like ? Here's the first test shot from this adaptor:


It's circular as I wanted !! :D


And the comparison between my flash grid adaptor and my honey comb adaptor. It's clearly shown that the honey comb has more flash spill than the grid one.

And the total time to take to make this DIY ? 2 hours. The precious two hours I had while I was waiting for my dinner. LOL.